Language
Currency
When you receive the confirmation email saying that we have approved your application to become a seller here on upXycled.com, you need to finalize setup of your new store, before you create your first product.
Login
Firstly if you’re not already logged in then login using the ‘Username’ or ‘Email’ and ‘Password’ you provided when submitting the Seller Registration Form.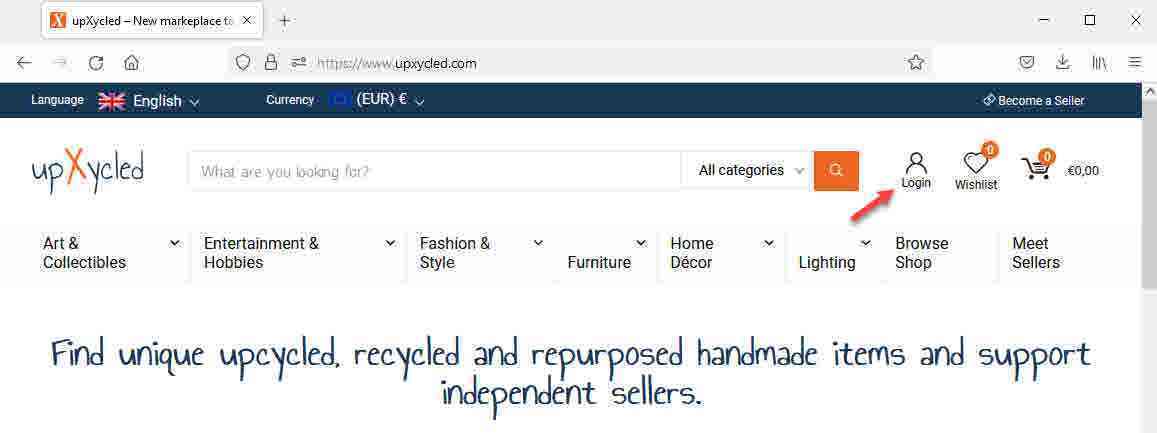
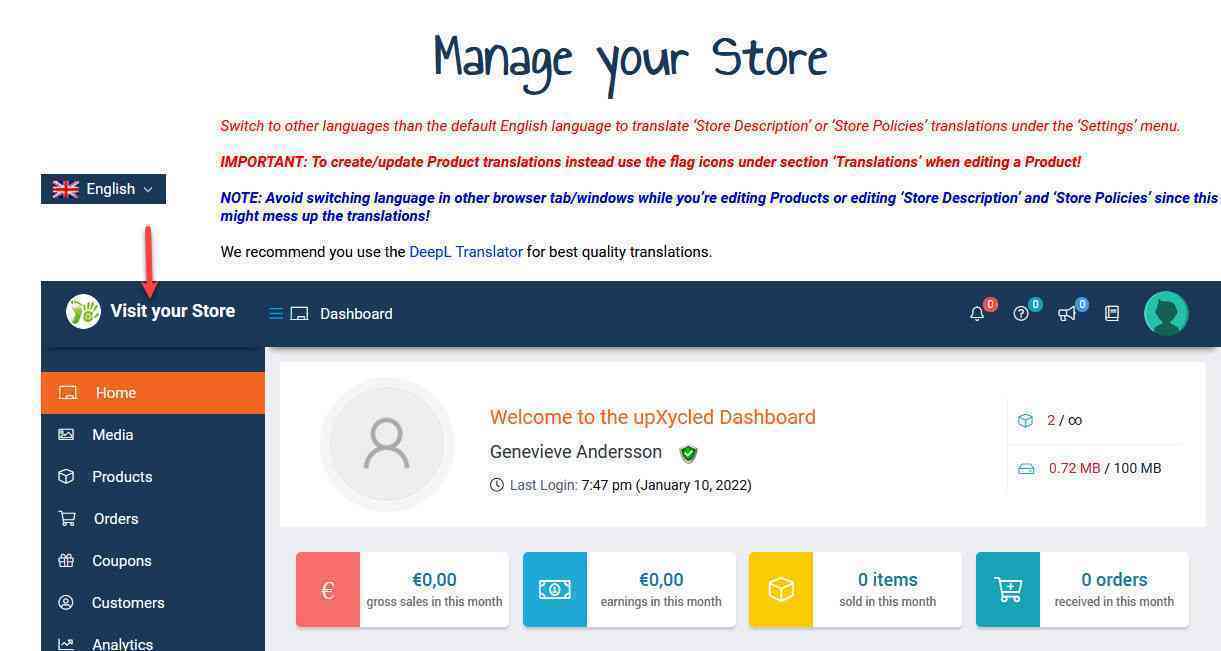
When you have logged in there is a link in the top menu saying ‘Manage your Store’.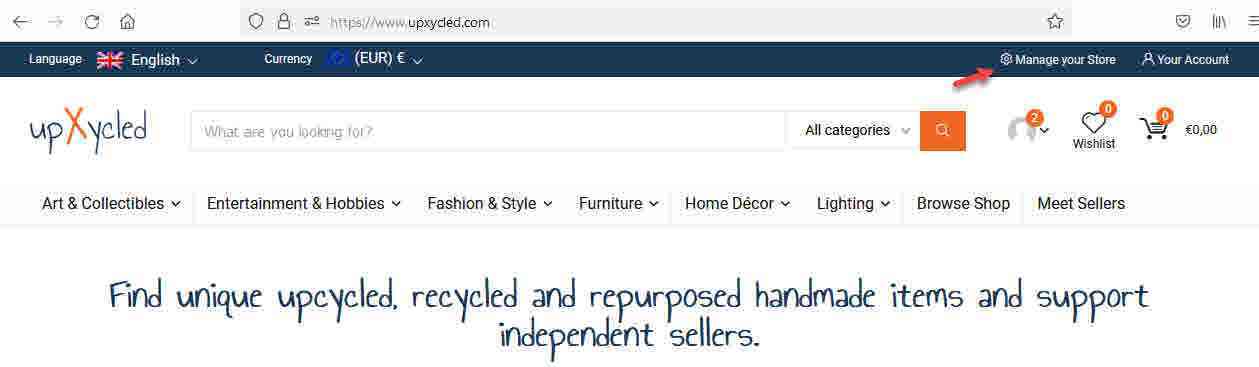
When you click the link a new tab/window will open with your Store Manager Dashboard.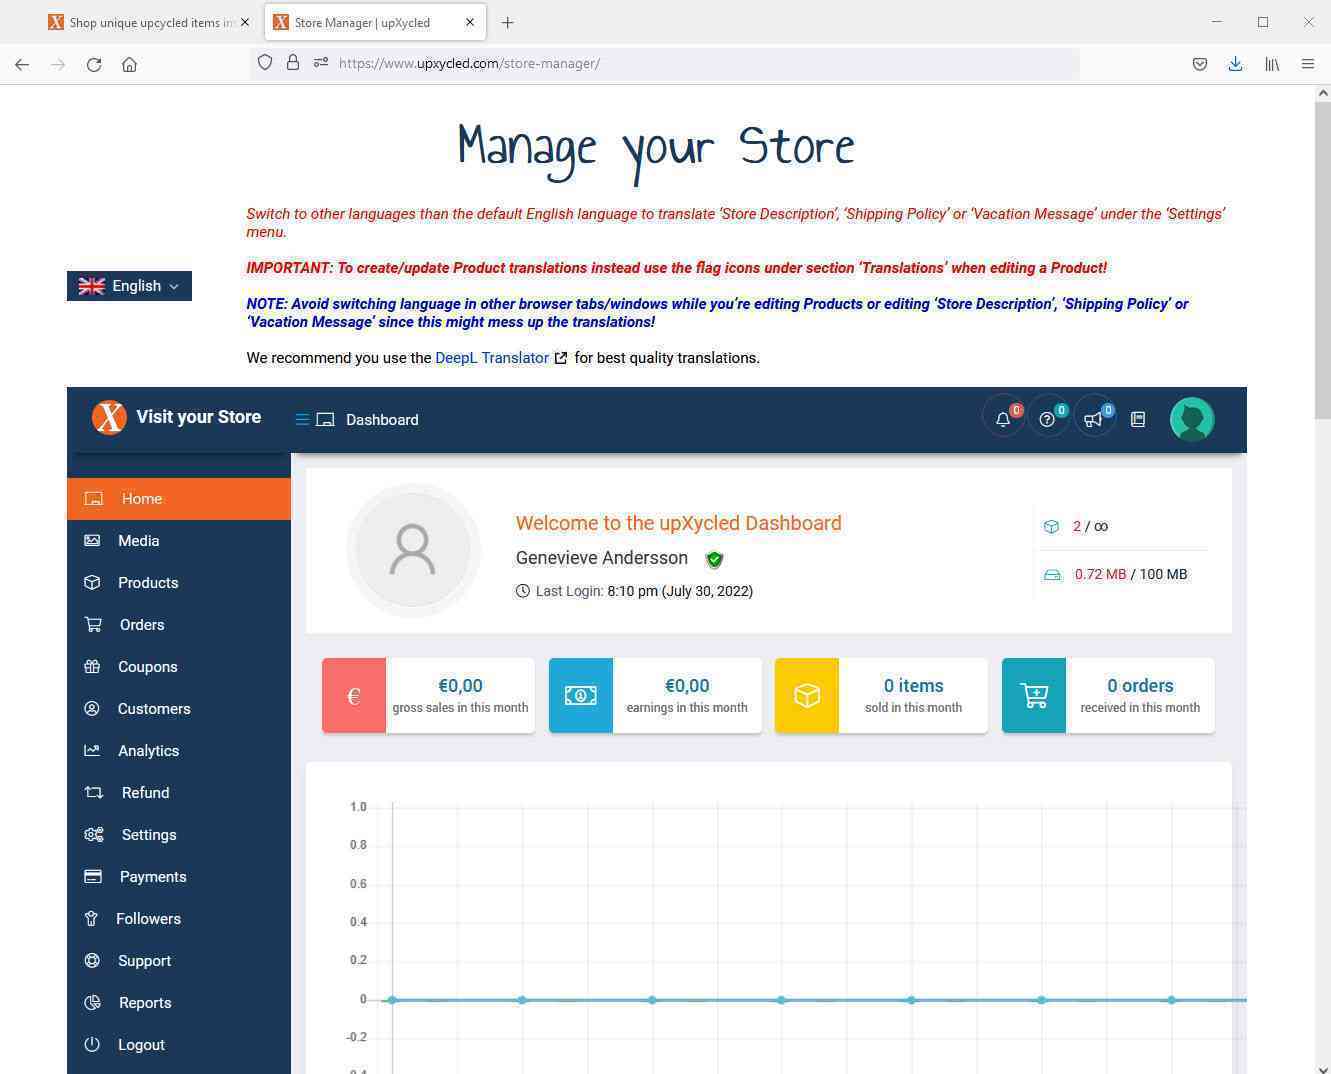
NOTE: The Store Manager Dashboard is only available in English language!
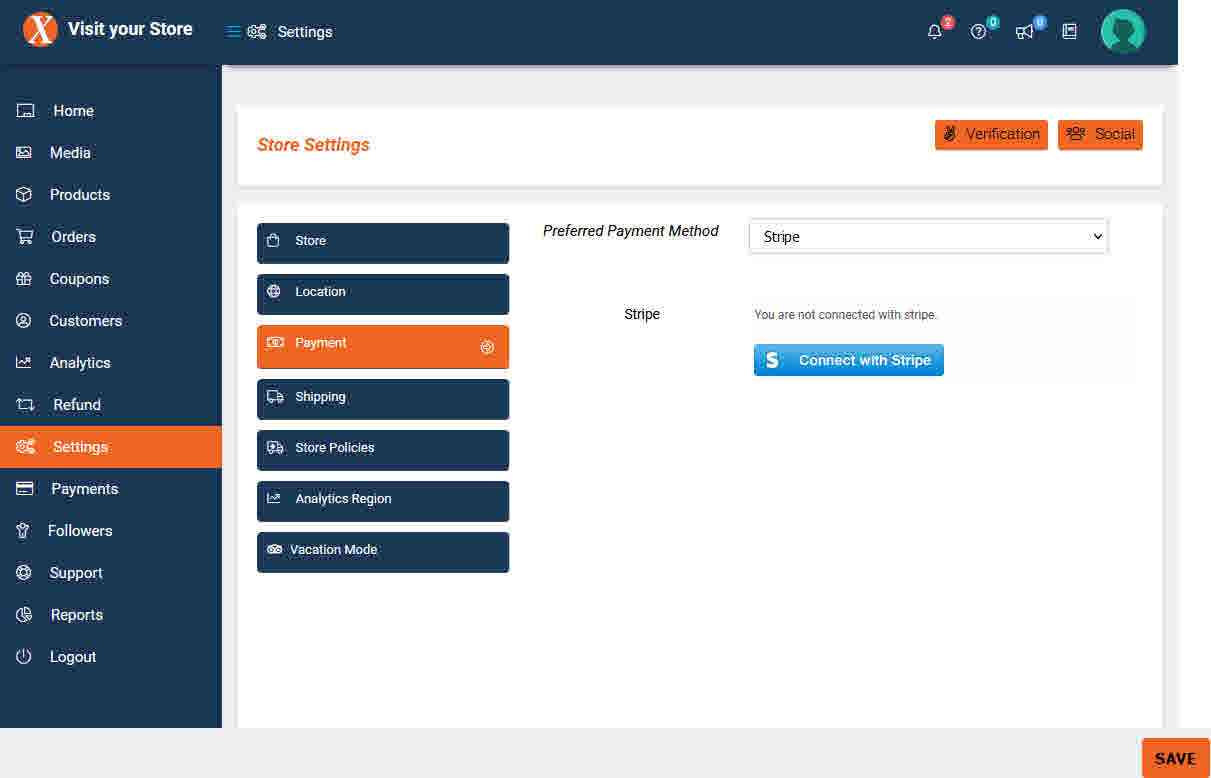
Preferred Payment Method
Our payment to you for completed orders happens via Stripe Connect ![]() . If you already have a Stripe account you can connect that to your Store Manager Dashboard, or you can apply for a new Stripe account directly from your Store Manager Dashboard.
. If you already have a Stripe account you can connect that to your Store Manager Dashboard, or you can apply for a new Stripe account directly from your Store Manager Dashboard.
To connect an existing Stripe account, or to apply for a new Stripe account navigate to Settings -> Payment and in the ‘Preferred Payment Method’ dropdown select “Stripe” and click the blue ‘Connect with Stripe’ button.
Follow Stripe’s guide either to connect an existing Stripe account, or to create a new Stripe account.
When you are done connecting to Stripe and redirected back to your Store Manager Dashboard you should now be connected to Stripe.
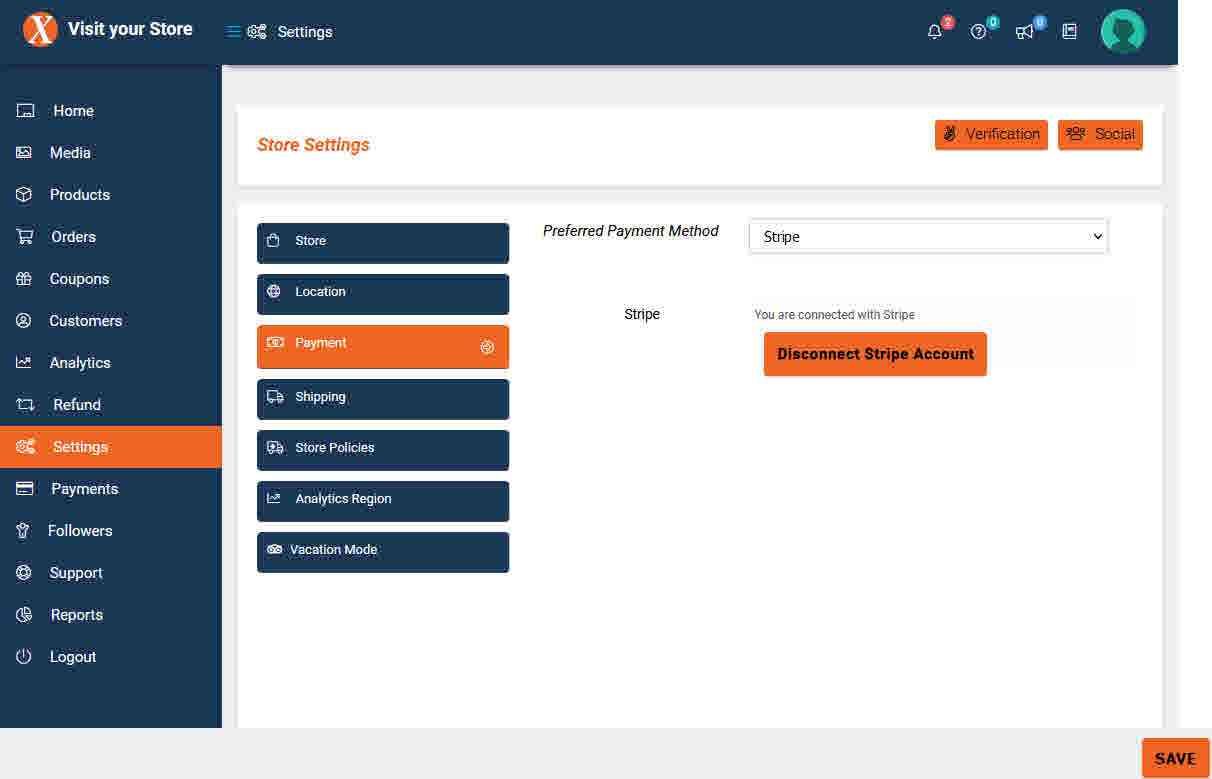
NOTE: Remember when connected to sign in to your Stripe account here ![]() and ensure your account is not marked as ‘restricted’. Until you have ensured it is not marked by Stripe as restricted we will not be able to transfer your payment to your Stripe account!
and ensure your account is not marked as ‘restricted’. Until you have ensured it is not marked by Stripe as restricted we will not be able to transfer your payment to your Stripe account!
d
Before you save continue to configure the shipping settings as instructed below.
d
Shipping
To setup Shipping rates navigate to Settings -> Shipping.

Notice all shipping prices are entered in Euro (€) which is also the Checkout currency for your customers. If Euro (€) is not the primary currency used in your country you can use XE Currency Converter ![]() or similar currency conversion calculators to calculate the shipping prices you want to set.
or similar currency conversion calculators to calculate the shipping prices you want to set.
First ensure ‘Enable Shipping’ is enabled (if not tick it) and then set you expected maximum ‘Processing Time’ (this information will be visible to your customers so be realistic). Notice that for each product you create later you can set individual processing times overriding this default value. Also set ‘Shipping Type’ to “Shipping by Country”.
Next decide what your ‘Default Shipping Cost (€)’ should be. We have preset it high to €100 to avoid that you accidentally provide free shipping in case your missed to configure shipping as instructed here. Probably you want to set the base shipping cost lower (e.g. €5). If you blank out this field and don’t specify other shipping prices in the below fields you will provide free shipping starting at any Cart total to all destinations. If you want to provide free shipping to all destinations probably better still to set this field and instead set a ‘Free Shipping Minimum Order Amount (€)’ below.
You can leave next field ‘First Item Shipping Cost (€)’ blank unless you want to add an additional shipping price for every first piece of different type of products your customers adds to the Cart. This rule does not include the first product added to the Cart, where only the above set ‘Default Shipping Cost (€)’ applies.
For instance if you set the ‘Default Shipping Cost (€)’ to €5 and ‘First Item Shipping Cost (€)’ to €2, then shipping price for product A no matter quantity would be €5 and product A + product B no matter quantity would be €5 + €2 = €7.
Likewise you can leave next field ‘Additional Items Shipping Cost (€)’ blank unless you want to add an additional shipping price for each additional piece of the same product your customers adds to the Cart. This rule does also include the first product added to the Cart.
For instance if you set the ‘Default Shipping Cost (€)’ to €5 and ‘First Item Shipping Cost (€)’ to €2 and ‘Additional Items Shipping Cost (€)’ to €1, then shipping price for product A would be €5 with quantity=1 and €6 with quantity=2.
Adding product B with quantity=1 on top of the already added product A with quantity=2 would be additional €2, so total shipping price €6 + €2 = €8.
And adding product B with quantity=2 on top of the already added product A with quantity=2 would be additional €3, so total shipping price €6 + €3 = €9.
You can leave ‘Free Shipping Minimum Order Amount (€)’ blank unless you want to enable free shipping above this amount to all destinations you are going to allow a product to be shipped to.
NOTE: When you later create products you can still on a per product basis decide whether you want to allow a product to be purchased from customers in all 33 countries we currently support, or only some of them!
In principle you can just set the desired default shipping prices and minimum order amount to qualify for free shipping in these 4 fields and then scroll down and click the ‘SAVE’ button. You would then be providing identical shipping prices and free shipping threshold to all destinations.
If you scroll further down you see this section allowing your nearby customers to pickup their orders at your store location.

If you want to allow that tick ‘Allow Local Pickup’ and optionally set a price for this in ‘Local Pickup Cost (€)’.
Finally you probably want to configure different shipping prices for the countries/states you allow your products shipped to.
Generally we recommend you allow purchases from customers in all or as many as possible of the listed countries, but be aware that based on your location compared to your customers locations and the size/weight of your products shipping to some countries may be quite expensive.
However, as long as you ensure to set your shipping rates for those shipping destinations high enough, then you may get some extra sales if customers in those destinations are willing to pay for the shipping.
The amount you enter for a country in ‘Cost(€)’ is added to the base shipping prices you may have already defined in ‘Default Shipping Cost (€)’, ‘First Item Shipping Cost (€)’ and ‘Additional Items Shipping Cost (€)’.
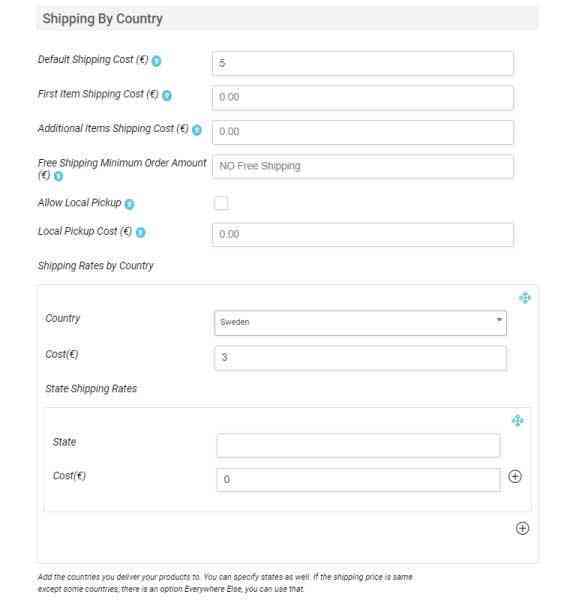
In above example a customer in Sweden would pay total €8 for shipping (default price €5 + additional €3 for Sweden).
NOTE: For countries like Sweden with no states the ‘State’ field should be left to default as above example!
Click the small + sign at the bottom of the last added country rule to add additional country rules.

For countries like United States (US) having states/counties/provinces/regions/cantons the ‘State’ field is a dropdown list showing the available choices. For the countries where the ‘State’ field is a dropdown list you can also specify different shipping prices for the listed states/counties/provinces/regions/cantons.
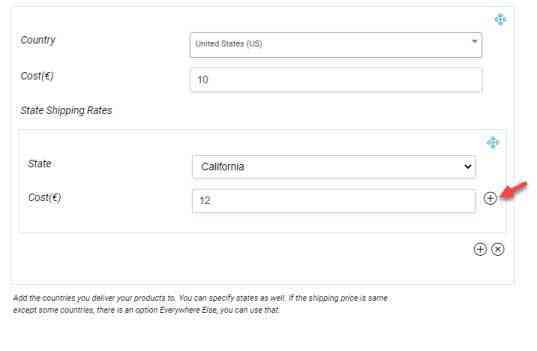
In above example a customer in United States (US) would pay total €15 for shipping (default price €5 + additional €10 for United States) except for California where a customer would pay total €17 for shipping (default price €5 + additional €12 for California).
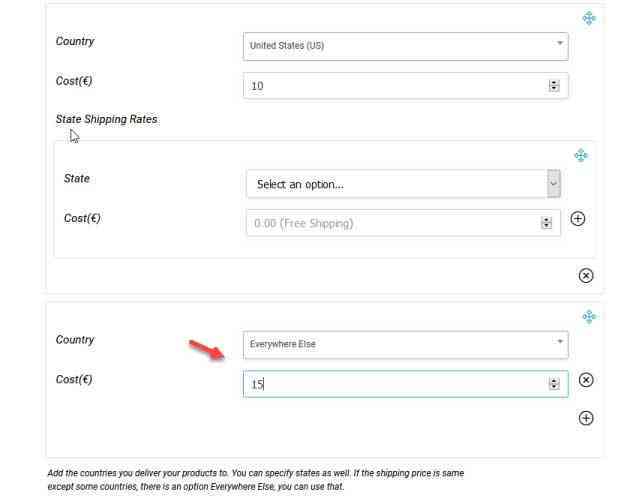
In case you left the default shipping cost fields blank unless you want to provide free shipping to some countries/states ensure to add all countries, or alternatively define shipping prices for some countries/states and then as the last rule add an ‘Everywhere Else’ rule to set a shipping price for all those countries/states you have not specifically set a shipping price for.
When you are done configuring your shipping rules don’t forget to scroll to the bottom and click the ‘SAVE’ button.
NOTE: When you have added your first product or products we recommend you test whether the shipping prices you defined are calculated as you expected, by adding one or more of your own products to the Cart and then in the Cart trying to calculate the shipping cost using different countries/states!
Determining shipping rates is a complex matter. Customers tend to prefer free or cheap shipping which may incline them to finalize a purchase whereas setting the shipping rates too high may cause abandoned carts.
However, providing free or cheap shipping especially if you sell large or heavy items or if you allow shipping to foreign countries may be costly for you.
It may prove a good strategy to incorporate some of the shipping cost into the price of your products instead of displaying high shipping rates in the Cart and Checkout scaring your customers away.
NOTE: Later when you create your products you can set individual shipping costs for some products (e.g. very heavy products)!
To recommend you the optimal choice of freight company depending on the size and weight of your products and your locations we would highly appreciate if you can share your experiences. You can contact us by sending a message to the administrator in the ‘Notification Board’ under ‘Send Direct Message – To Store Admin’.

We will gather these recommendations in the article About Shipping.
You have now configured your preferred payment method and shipping rates and in principle you can start creating your products. But we recommend you read through the rest of this article to fully complete the setup of your store.
Branding
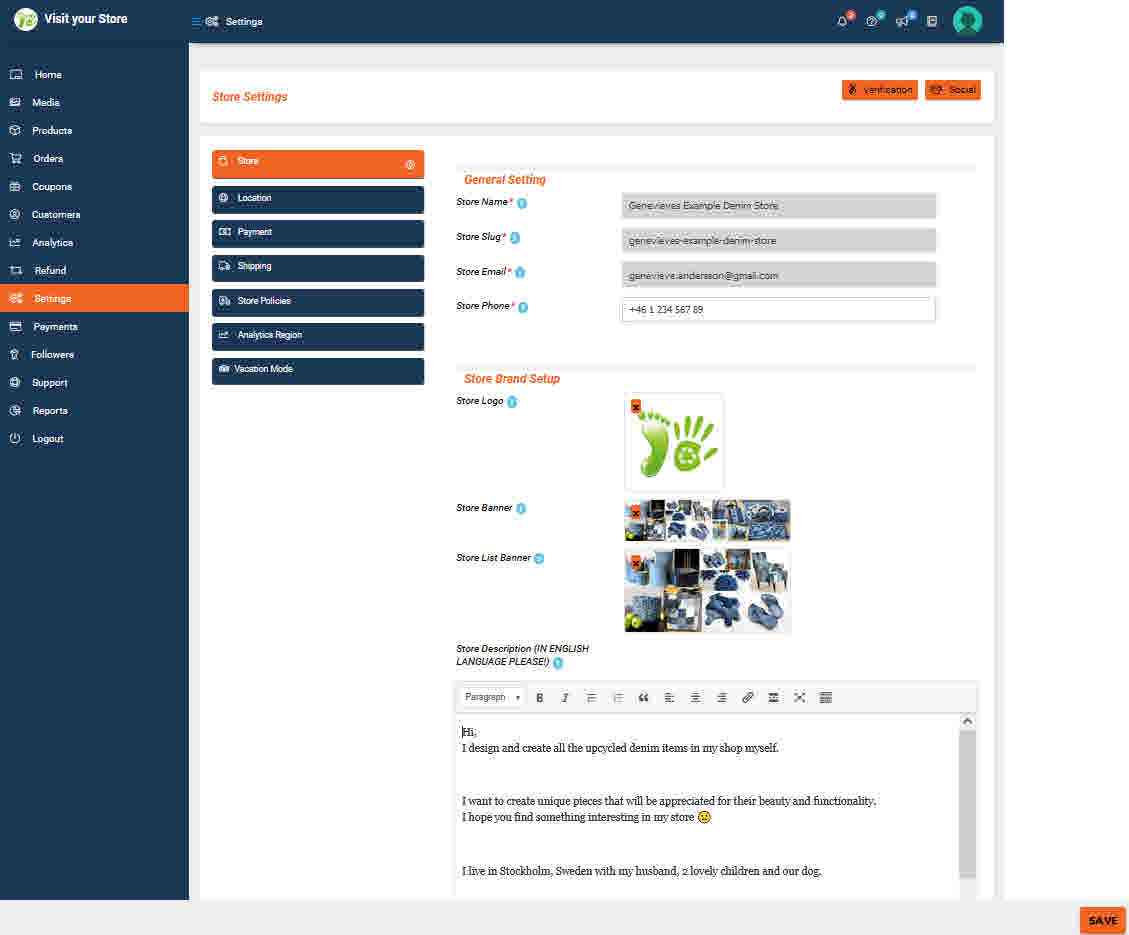
To personalize your store you should add a Store Logo, a Store Banner, a Store List Banner as well as a Store Description.
Navigate to Settings -> Store.
To create the logo and banners you can download GIMP ![]() which is a great free image editor and a good alternative to the well known but licensed Adobe Illustrator
which is a great free image editor and a good alternative to the well known but licensed Adobe Illustrator![]() .
.
If you don’t feel comfortable creating the Logo and Banners yourself you can pay a freelance designer to do it (e.g. locate a freelancer on fiverr ![]() ), or you can create free logos and banners using Canva
), or you can create free logos and banners using Canva ![]() .
.
You can also create your Logo an Banners based on readymade stock pictures (e.g. you can find countless pictures at shutterstock ![]() where you are often allowed to use the pictures for purposes like this for a small fee), or perhaps you can shoot a photo yourself (e.g. showing one of your products).
where you are often allowed to use the pictures for purposes like this for a small fee), or perhaps you can shoot a photo yourself (e.g. showing one of your products).
Store Logo
The Store Logo will be visible on your Store Page and when viewing your products and should measure 125 x 125 pixels. It can be a small photo of yourself, or whatever your prefer.
Store Banner
The Store Banner will be visible on your Store Page and should optimally measure near 1600 x 450 (w x h) pixels or similar measurements close to a 4:1 aspect ratio. Maximum image size we allow you to upload is 1 Mb, but we recommend to keep it below 200 Kb for faster loading of your Store Page. Generally jpg format should be preferred over png format due to smaller size.
Store List Banner
The Store List Banner will be visible on the Sellers List page and should optimally measure near 600 x 300 (w x h) pixels or similar measurements close to a 2:1 aspect ratio. If you don’t add a Store List Banner instead the above Store Banner will be used also on the Sellers List page (some cropping will happen due to different aspect ratios).
Store Description (IN ENGLISH LANGUAGE PLEASE!)
The Store Description will be visible on your Store Page under the ‘About’ section.
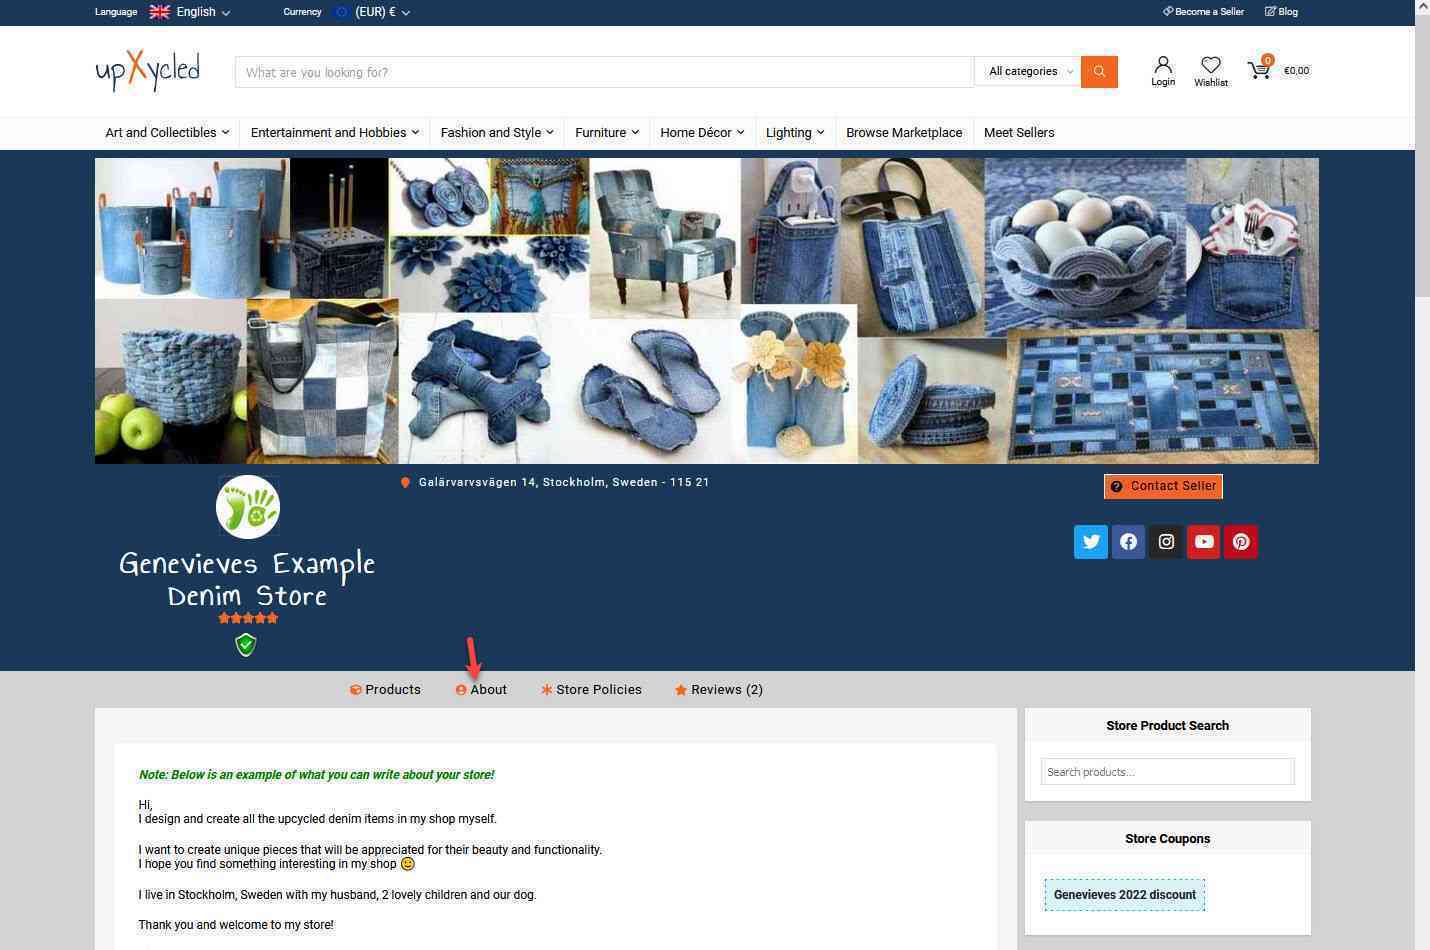
Here you can provide whatever information you like in English language. For instance you can introduce yourself, provide relevant information about your store, answer some Frequently Asked Questions (F.A.Q.) and bid your customers welcome.
No need to explain your shipping policies here since you will be adding those further down under section ‘Store Policies’.
The editor is not very advanced, so if you want to add text in colors or do other formatting we recommend you use Online HTML Editor ![]() ,
,
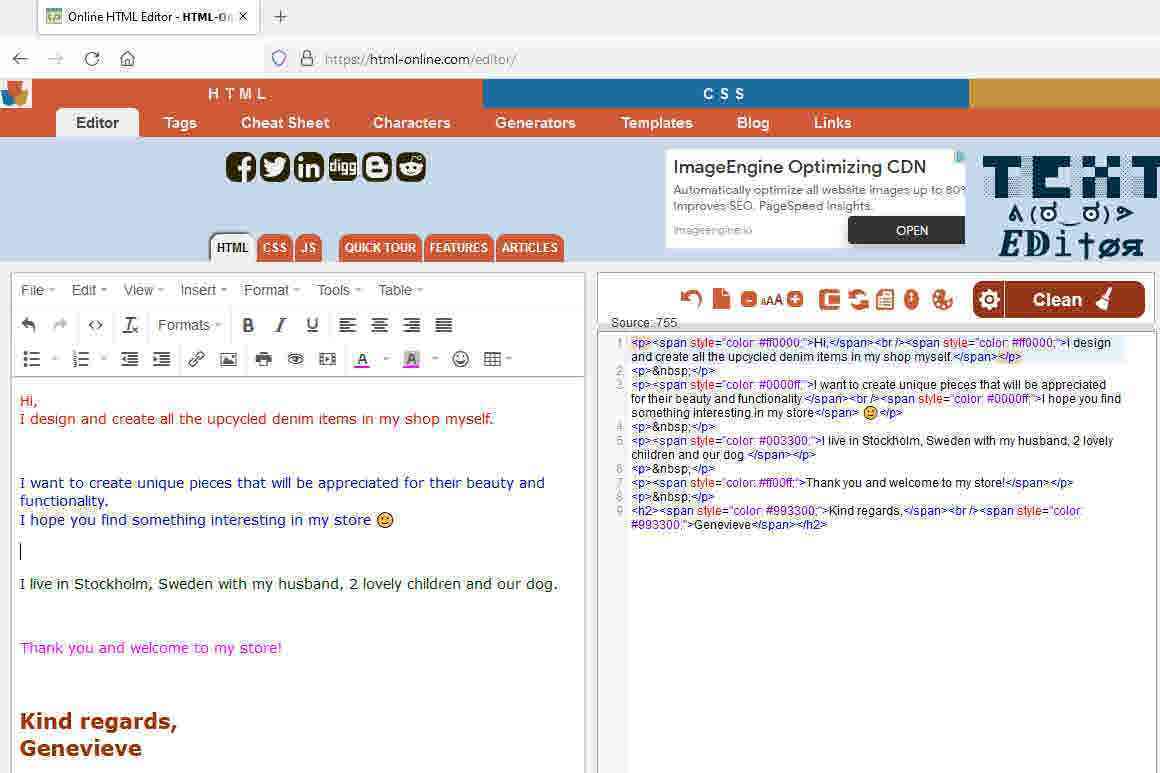
and then copy the generated html code to the ‘Store Description’ field.

When you are done adding the Logo, Banners and Store Description don’t forget to scroll to the bottom and click the ‘SAVE’ button.
After you have saved you can optionally but recommended translate your Store Description to other languages supported by upXycled.com.
IMPORTANT: Avoid switching language in other browser tab/windows both viewing the ‘Store Manager Dashboard’ as well as other upXycled pages while you’re editing the ‘Store Description’ since this might mess up the translations!
You do this by switching to another language than the default English language.![]()
And then under menu Settings {LANGUAGE NAME} -> Store add your translated Store Description for that selected language like this example where we are adding a German translation.![]()
NOTE: We recommend you use the DeepL Translator ![]() for best quality translations!
for best quality translations!
When you are done adding the translated Store Description don’t forget to scroll to the bottom and click the ‘SAVE’ button.
IMPORTANT: When saved use the language switcher to switch back to default English language, before you continue!
Location
Verify under Settings -> Location that correct address information and Google Maps location are entered.
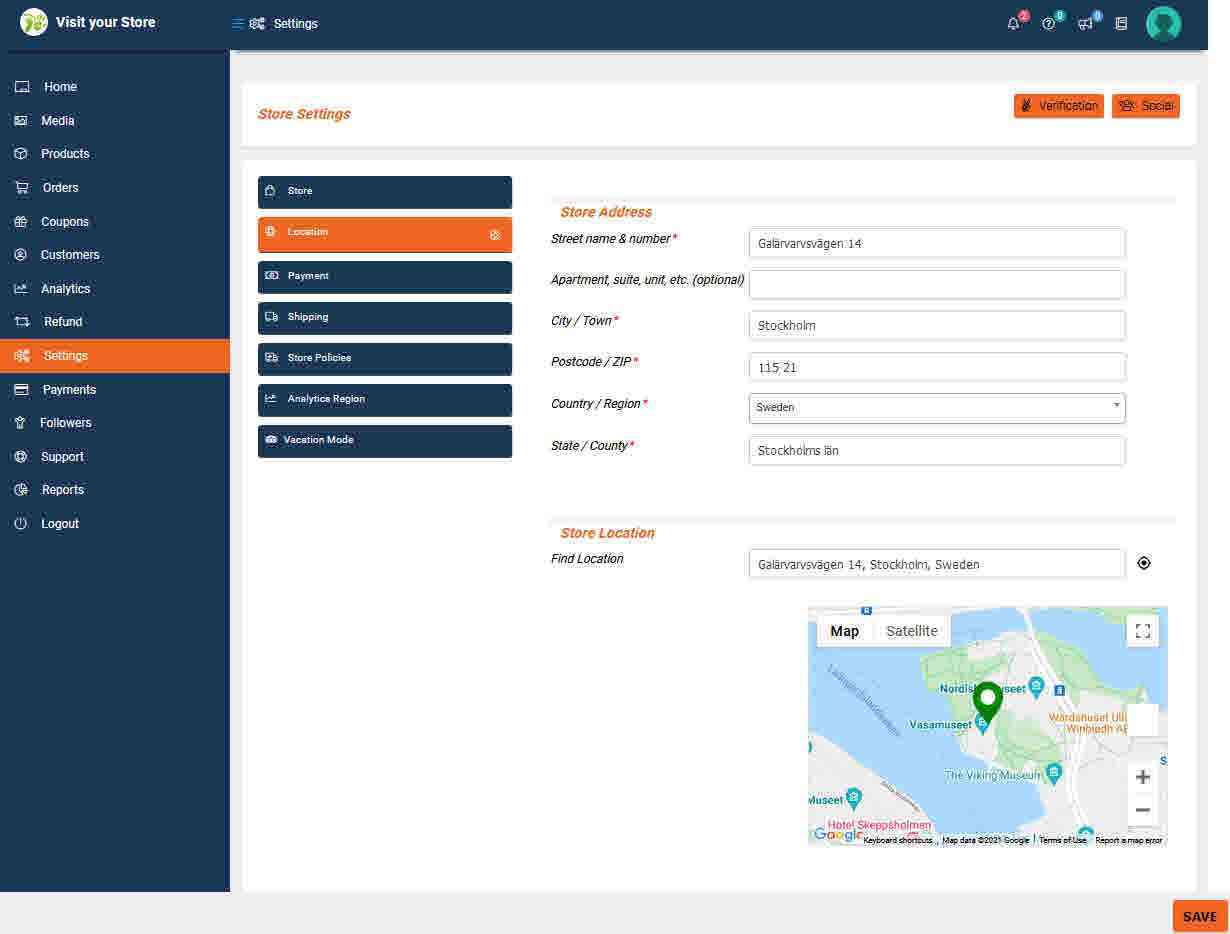
If you update the location settings don’t forget to click the ‘SAVE’ button.
Store Policies
To see the default Store Policies click the ‘Visit your Store’ link.
And click the ‘Store Policies’ link.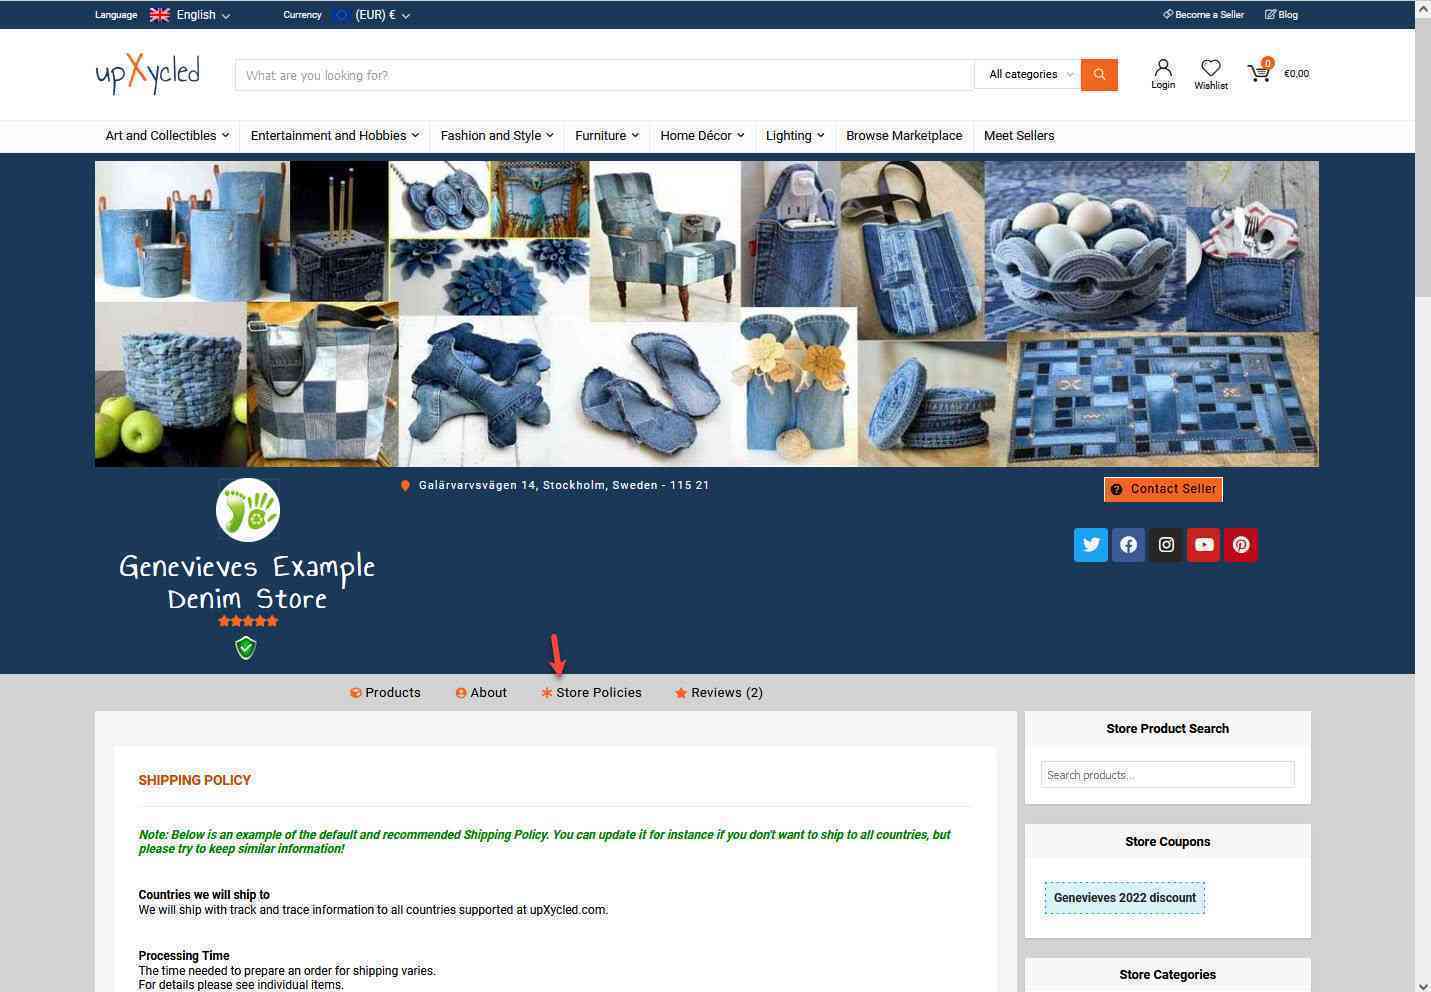
NOTE: The Store Policies are also visible when viewing your products and they are translated to other languages!
We have prefilled the ‘Shipping Policy’ field with a template suggesting you want to allow your products to be shipped to all 33 countries currently supported by our platform. Feel free to update the field for instance if you don’t want to ship to all 33 countries, but try to keep similar information as in the prefilled template.
To update the ‘Shipping Policy’ field navigate to Settings -> Store Policies.

NOTE: When you later create products you can on a per product basis decide whether you want to allow a product to be purchased from customers in all 33 countries, or only selected countries. For instance if you allow some of your smaller/lighter products to be shipped to all 33 countries, but restrict bigger/heavier products only to nearby countries due to shipping costs, then you should also mention under the ‘Shipping Policy’ field that some of your bigger/heavier products are not shipped to all countries!
If you update ‘Shipping Policy’ then after you have saved you should also update the translations of your Shipping Policy to other languages supported by upXycled.com (else these translations will continue to show the default Shipping Policy).
IMPORTANT: Avoid switching language in other browser tab/windows both viewing the ‘Store Manager Dashboard’ as well as other upXycled pages while you’re editing the ‘Shipping Policy’ since this might mess up the translations!
You do this by switching to another language than the default English language.
![]()
And then under menu Settings {LANGUAGE NAME} -> Store Policies add your translated Shipping Policy for that selected language like this example where we are updating the default German translation.![]()
NOTE: We recommend you use the DeepL Translator ![]() for best quality translations!
for best quality translations!
When you are done updating the translated Shipping Policy don’t forget to scroll to the bottom and click the ‘SAVE’ button.
IMPORTANT: When saved use the language switcher to switch back to default English language, before you continue!
Besides the ‘Shipping Policy’ field on your Store Page you also see the ‘Cancellation & Return Policy’ and ‘Terms & Conditions and Privacy Policy’ fields prefilled.
For the ‘Cancellation & Return Policy’ field you should leave it as-is unless you want to provide your customer better terms than stated, or if you have something relevant to add. You can contact the Store Admin if you have something to add.
Likewise, you must leave the ‘Terms & Conditions and Privacy Policy’ as-is, but if you have something relevant to add you can contact the Store Admin.
NOTE: You are not allowed to write something in the ‘Cancellation & Return Policy’ or in the ‘Terms & Conditions and Privacy Policy’ fields that does not comply to upXycled’s overall Terms & Conditions and Privacy Policy!
Verification
All though not mandatory we strongly recommend you go through seller verification to document to us and to your customers that you are who you say you are.
We do advice customers to purchase products with the Seller Verified badge and we will also give your products better exposure if you are a verified seller.
To verify your account navigate to Settings and click the ‘Verification’ button.

First click the ‘Connect to Facebook’ button to link your Facebook account to your store.
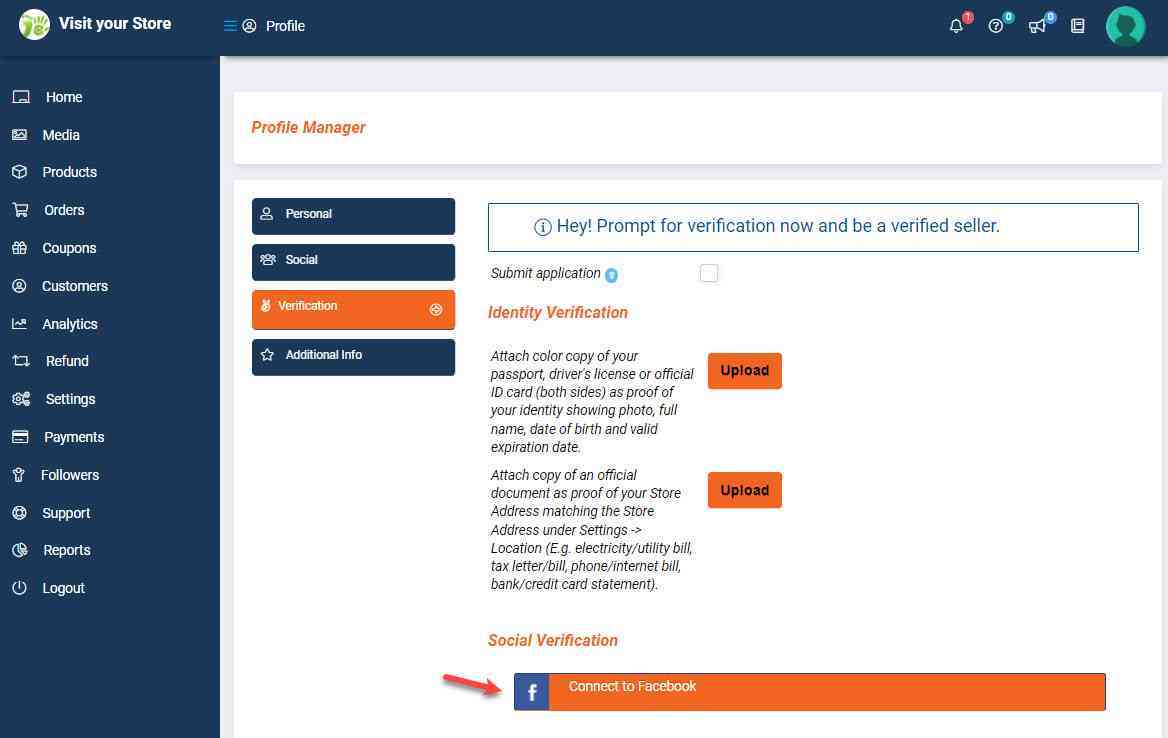
If you are not already logged on to your Facebook account it will redirect you to a Facebook Login page.
When logged in to Facebook you will then be returned to your Store Manager Dashboard -> Profile Manager where you again need to select ‘Verification’ in the menu.
You should now see your Facebook account connected under ‘Social Verification’.

As proof of your identity click the first ‘Upload’ button to attach a color copy of your Passport, Driver’s License or an official ID Card (copy both sides please). The copy must clearly show your photo, full name, date of birth and a valid expiration date.
As proof of your Store Address click the second ‘Upload’ button to attach an official document matching your Store Address visible under Settings -> Location. This can for instance be an electricity/utility bill, a tax letter/bill, a phone/internet bill or a bank/credit card statement.

Finally tick the ‘Submit application’ checkbox and click the ‘SAVE’ button to submit your verification data to the upXycled Administrator.
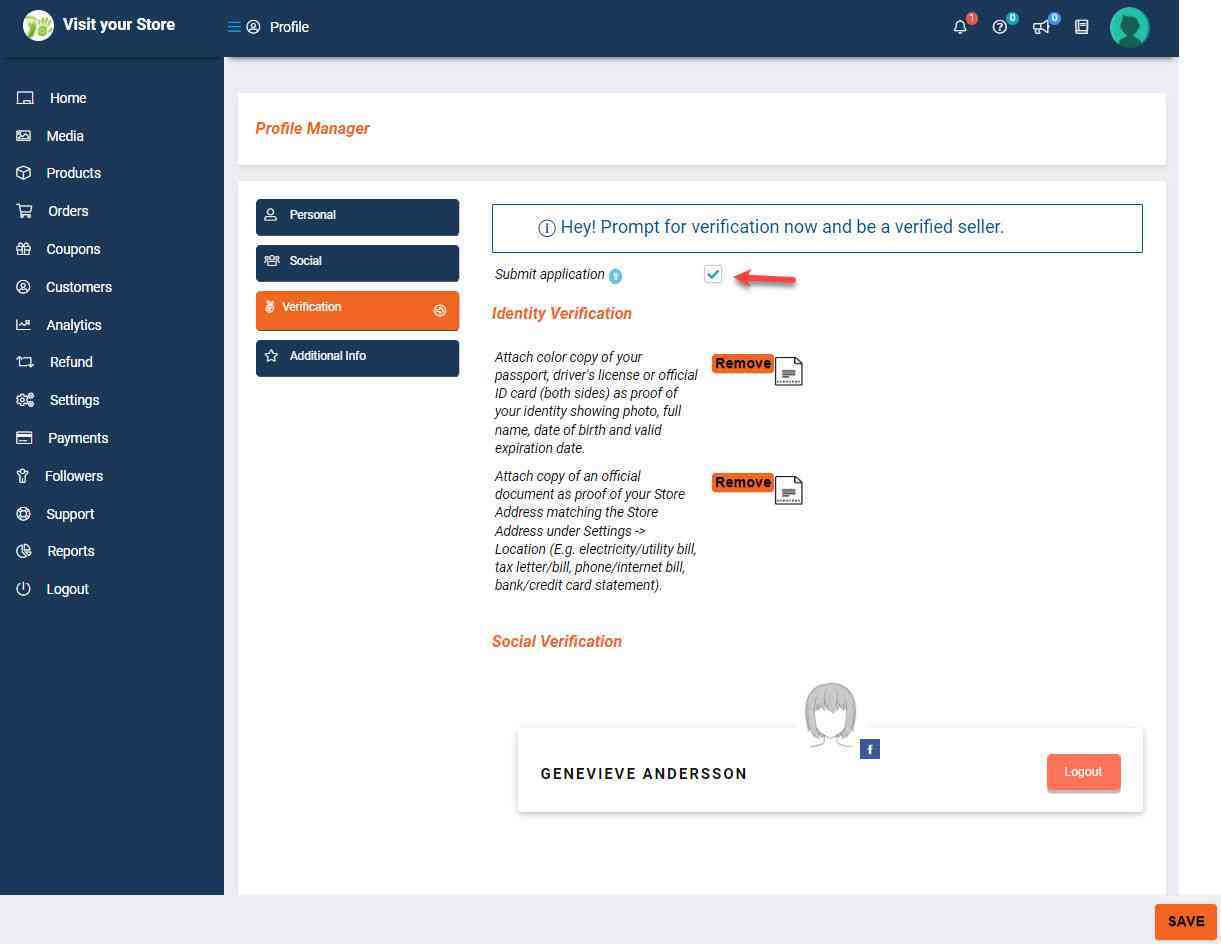
Once we have approved your verification application your customers will see the ‘Verified Seller’ icon when viewing your products and your Store Page.
NOTE: As soon as we have reviewed your verifiction application we will delete the attachments you uploaded and we will not keep a copy of them!
Social Links
If you want to share links to your Twitter, Facebook, Instagram, Youtube or Pinterest pages with your customers navigate to Settings and click the ‘Social’ button.
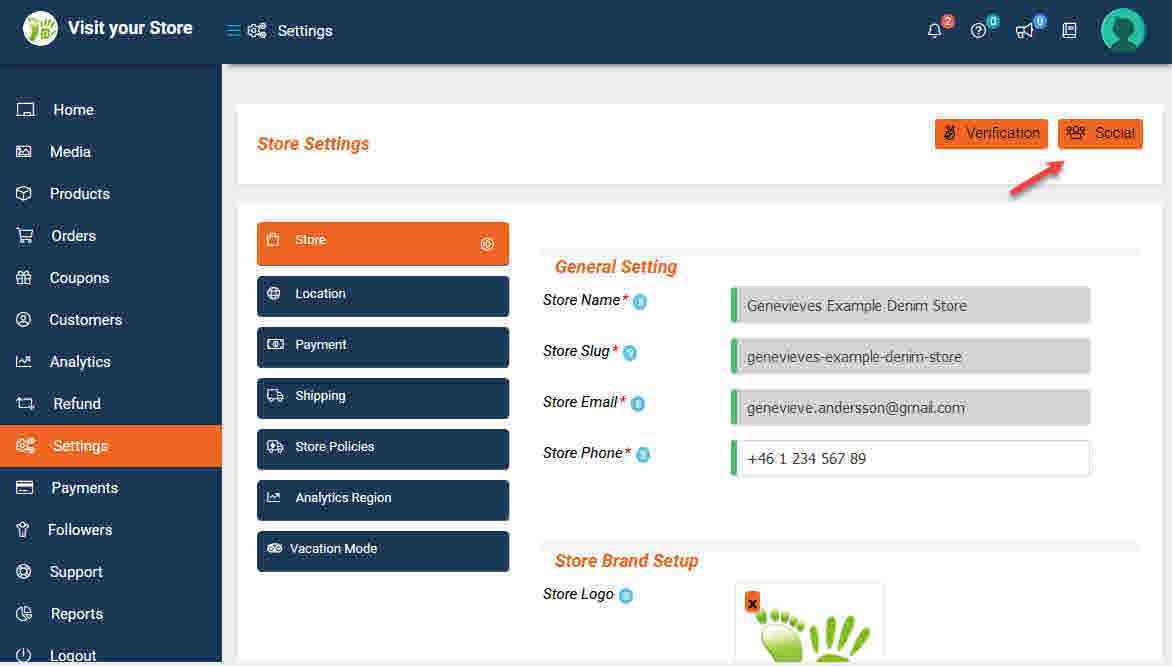
And add the links to your social pages and then click the ‘SAVE’ button.
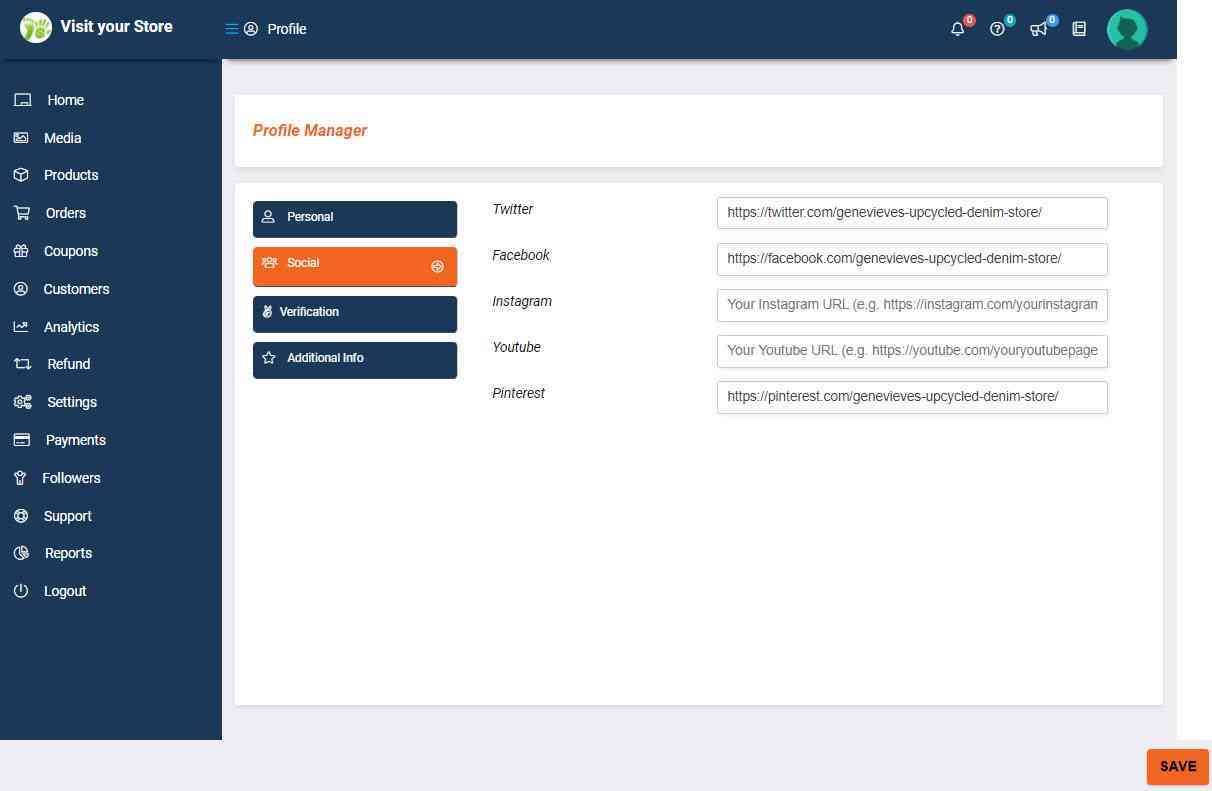
NOTE: Only links to social pages owned by you with relevant content supporting your store are allowed!
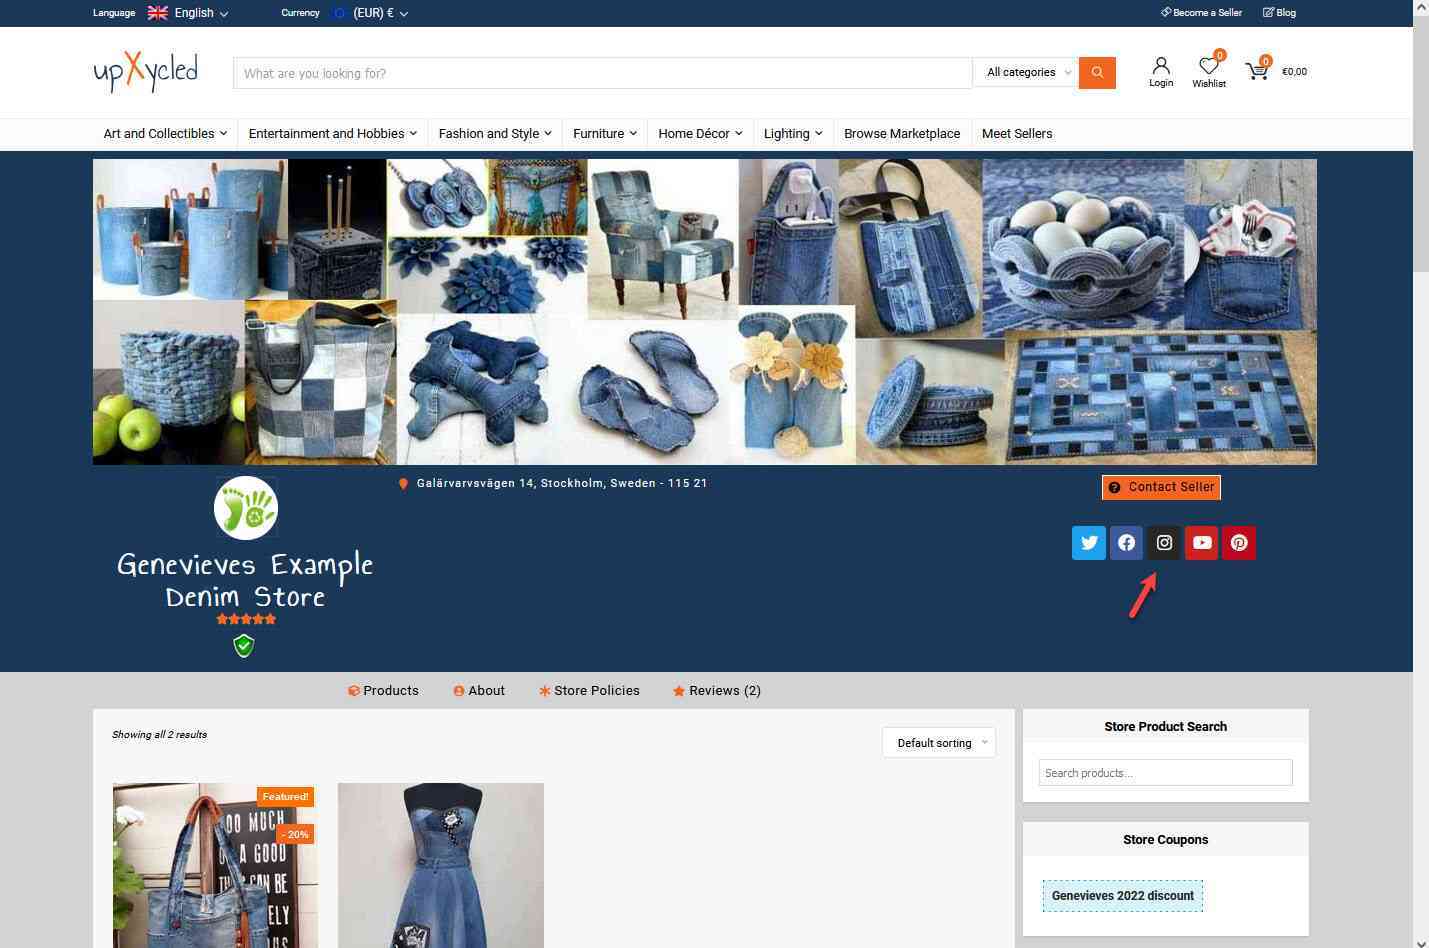
The links to your social pages will be visible on your Store Page.

Your store is now configured and you can continue to